WebSocket with NodeJS
특징
http 통신 기반의 실시간 양방향 통신을 위한 프로토콜이다.
지속적인 연결로 채팅등의 양방향 통신이 가능하다.
처음 연결시에는 http(s) 통신을 이용해 연결 및 인증 수행 후, ws(s) 통신을 수행한다.
구현
nodejs
npm install express
npm install ws
app.js
const path = require("path");
const express = require('express');

// ========================================================
// Web Server
const app = express();

app.use("/", (req, res)=>{
    res.sendFile(path.join(__dirname, './index.html'));
})

const HTTPServer = app.listen(30001, ()=>{
    console.log("Server is open at port:30001");
});

// ========================================================
// WebSocekt Server
const wsModule = require('ws');

const webSocketServer = new wsModule.Server({
        server: HTTPServer, // WebSocket서버 HTTP서버 지정
        // port: 30002      // 별도 ws(s) 포트 할당 가능
    }
);

// ========================================================
// WebSocket Server Event
webSocketServer.on('connection', (ws, request)=>{

    // ====================================================
    // event : connection
    const ip = request.headers['x-forwarded-for'] || request.connection.remoteAddress;
    console.log(`새로운 클라이언트[${ip}] 접속`);

    if(ws.readyState === ws.OPEN){
        ws.send(`클라이언트[${ip}] 접속을 환영합니다 from 서버`);
    }

    // ====================================================
    // event : message
    ws.on('message', (msg)=>{
        console.log(`클라이언트[${ip}]에게 수신한 메시지 : ${msg}`);
        ws.send('메시지 잘 받았습니다! from 서버')
    })

    // ====================================================
    // event : error
    ws.on('error', (error)=>{
        console.log(`클라이언트[${ip}] 연결 에러발생 : ${error}`);
    })

    // ====================================================
    // event : close
    ws.on('close', ()=>{
        console.log(`클라이언트[${ip}] 웹소켓 연결 종료`);
    })
});
index.html
<!DOCTYPE html>
<html lang="ko">
<head>
    <meta charset="UTF-8">
    <meta name="viewport" content="width=device-width, initial-scale=1.0">
    <title>웹소켓</title>
</head>
<body>
    <h1>웹소켓 테스트</h1>

    <button id="btn_send">메시지 전송</button>
    <button id="btn_close">연결 끊기</button>
</body>
<script>
    // ====================================================
    // connect
    const webSocket = new WebSocket("ws://localhost:30001");

    // ====================================================
    // on open
    webSocket.onopen = () => {
        console.log("웹소켓서버와 연결 성공");
    };

    // ====================================================
    // receive message
    webSocket.onmessage = function (event) {
        console.log(`서버 웹소켓에게 받은 데이터: ${event.data}`);
    }

    // ====================================================
    // on close
    webSocket.onclose = function() {
        console.log("서버 웹소켓 연결 종료");
    }

    // ====================================================
    // on error
    webSocket.onerror = function(event) {
        console.log(event)
    }

    let count = 1;
    document.getElementById("btn_send").onclick = function() {
        if(webSocket.readyState === webSocket.OPEN) {
            // ============================================
            // send
            webSocket.send(`증가하는 숫자를 보냅니다 => ${count}`);
            count++;
        }else{
            alert("연결된 웹소켓 서버가 없습니다.");
        }
    }

    document.getElementById("btn_close").onclick = function() {
        if(webSocket.readyState === webSocket.OPEN) {
            // ============================================
            // close
            webSocket.close();
        }else{
            alert("연결된 웹소켓 서버가 없습니다.");
        }
    }
</script>
</html>
node .\app.jshttp://localhost:30001/index.html 로 접속한다.
wss
여기 를 참조하여 인증서를 생성한다.
var path = require("path");
var express = require('express');
var https = require('https');
var fs = require('fs');

var options = {
    key: fs.readFileSync('c:/dev/ssl/server.key'),
    cert: fs.readFileSync('c:/dev/ssl/server.crt')
};

// ========================================================
// Web Server
var app = express();

app.use("/", (req, res)=>{
    res.sendFile(path.join(__dirname, './index.html'));
});

var HTTPServer = https.createServer(options, app).listen(30001, ()=>{
    console.log("Server is open at port:30001");
});

......
const webSocket = new WebSocket("wss://localhost:30001");서버 https 구성 후, 클라이언트에서 wss 로 protocol 만 변경하는 것으로 설정이 끝난다.
자세히 보기
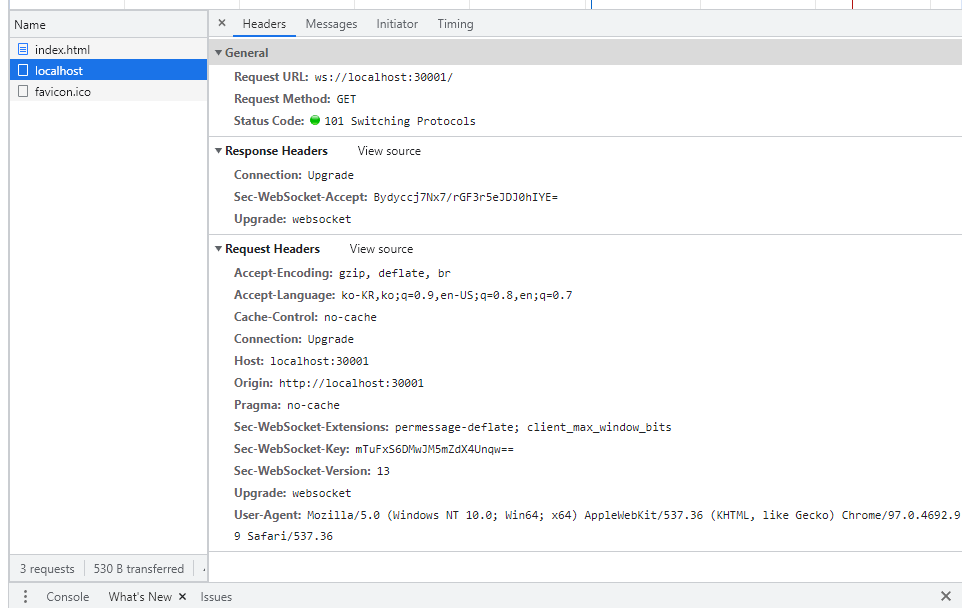
아래 이미지는 크롬 F12 네트워크 탭이다.

Request
-
Origin: http://localhost:30001
http 에서 작동하고 있는 것을 확인할 수 있다.
-
Connection: Upgrade, Upgrade: websocket
Request(요청) 이 Connection 은 Upgrade 이며, websocket 으로의 Request 임을 알 수 있다.
-
Sec-WebSocket-Key: mTuFxS6DMwJM5mZdX4Unqw==
클라이언트가 전송하는 인증키이다.
Response
-
Connection: Upgrade, Upgrade: websocket
Connection 이 websocket 으로 Upgrade 되었음을 알 수 있다.
-
Sec-WebSocket-Accept: Bydyccj7Nx7/rGF3r5eJDJ0hIYE=
클라이언트가 전송한 인증키에 대한 Response Key 이다.
General
-
Request URL: ws://localhost:30001/
최종적으로 ws 프로토콜로 전환되었고, 더 이상 크롬은 데이타를 표시해 주지 않는다.
(http 프로토콜이 없으므로…)
ws 접속 이후에는?
ws 프로토콜 변환 이후에는 0x00 ~ 0xFF 사이에 UTF8 데이타(텍스트 or 바이너리) 를 전송한다는 규약 이외에 세부 규약이 없다.
즉, 이미지 또는 동영상을 보내고 싶으면 자체적으로 protocol 을 정하고,
그 protocol 에 따라 데이타를 전송하고 수신하게 된다.